

How To Save Disk Space On Windows 10
When you lot use Windows x, the internal storage on your PC fills upwards gradually over time. That'south not a major problem on high capacity HDDs and SSDs. But you'll run into space-related snags on drives that don't offer much animate room to start with.
Yous can rely on several methods to gratis upwards disk space in Windows 10. Some of them help yous complimentary upward tens (if not hundreds) of gigabytes, while others internet you only a few extra megabytes.

1. Costless Up Recycle Bin
When you lot delete files on your estimator, Windows 10 does not remove them outright. Instead, it stashes them away in the Recycle Bin. That allows you to restore deleted files if y'all change your heed after. Only you terminate up trading disk space for convenience.
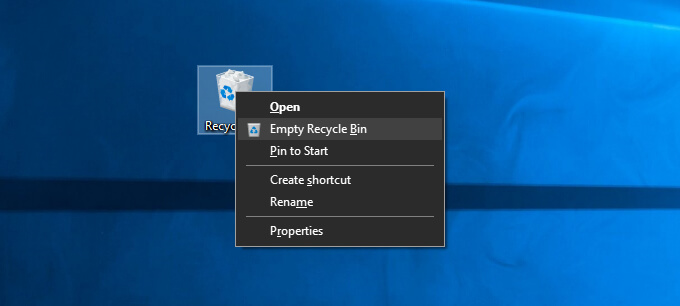
If yous don't plan on restoring any deleted files, yous can choose to empty the Recycle Bin. To practise that, right-click the Recycle Bin icon on the desktop and select Empty Recycle Bin. Alternatively, you can open the Recycle Bin and remove select files inside it.
Information technology'south also possible to delete a file permanently without sending it to the Recycle Bin by pressing Shift + Delete later selecting it.
2. Clear the Downloads Folder
The Downloads folder on your Windows 10 PC is a hotspot for junk files and program installers that you'll rarely ever re-utilize.
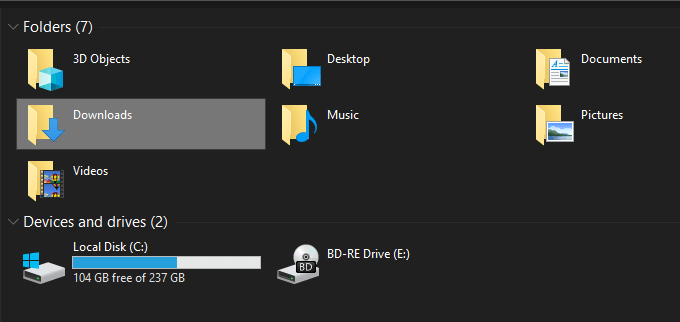
Open File Explorer and select This PC > Downloads on the sidebar. Then, delete whatsoever files that you lot don't want. Y'all can likewise switch the folder to List view and filter files past Size to locate and remove items that use upwardly infinite the well-nigh.
3. Delete Unwanted Apps
Getting rid of unwanted apps and programs from your computer is another quick style to cut down the amount of used storage on your Windows x computer.
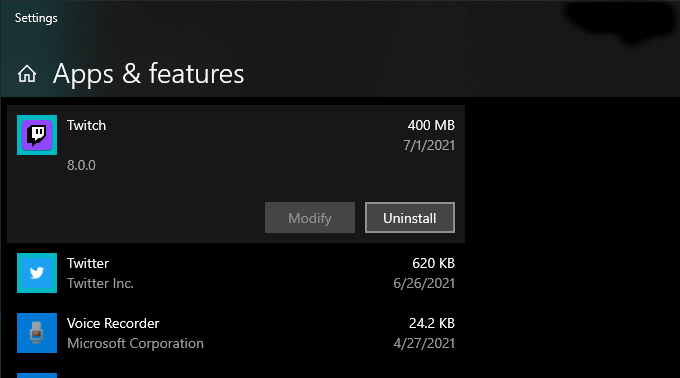
To do that, open up the Start menu and get to Settings > Apps > Apps & Features. Then, whorl through the list, option the apps you don't use anymore, and select Uninstall to delete them.
4. Utilize Files On-Demand in OneDrive
OneDrive comes built into Windows ten and allows you to back upwardly documents and photos to the cloud hands. It also supports Files On-Demand functionality, allowing you to download backed-upward files to local storage merely when needed.
To enable Files On-Need in OneDrive, select the OneDrive icon on the taskbar and choose Assistance & Settings > Settings. On the Microsoft OneDrive dialog box that then shows up, switch to the Settings tab. Follow that by checking the box next to Save space and download files equally you apply them.
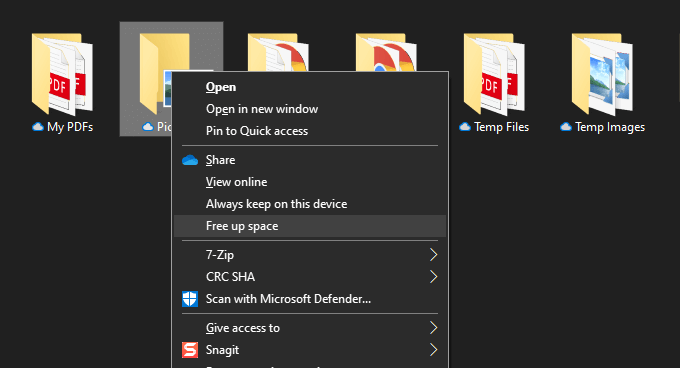
With Files On-Demand active, you can directly offload backed-up files and folders whenever you want by right-clicking and selecting Free up space. Y'all'll continue to run into placeholder icons of the items. Attempting to access an offloaded file shall prompt OneDrive to download it locally.
v. Employ Storage Pane in Settings
Windows 10's Settings app comes with a Storage pane to assistance you identify data types that utilize up the most amount of storage on your PC.
You lot tin can access information technology by going to Outset > Settings > System > Storage. You'll and so run into a listing of categories such every bit Apps & Features, Temporary Files, Pictures, Music, etc., all of which you tin can dive into and remove space-consuming programs and files.
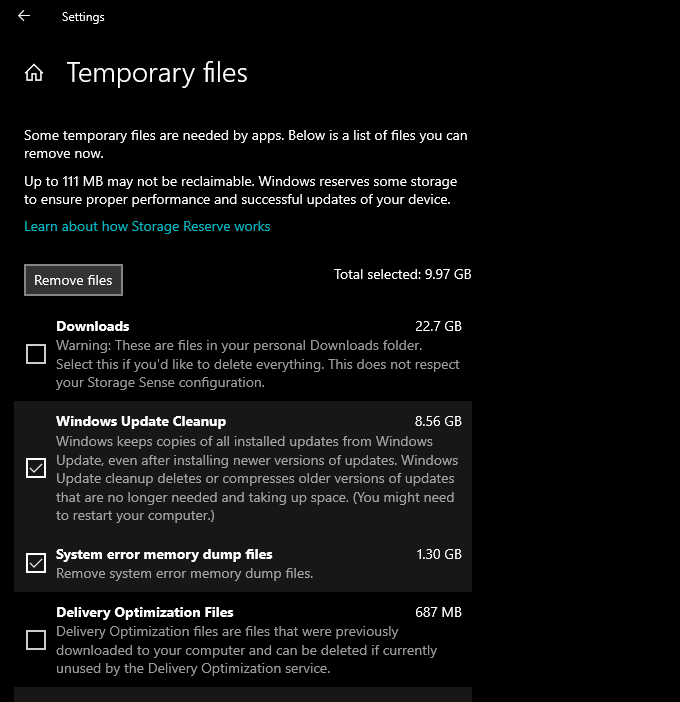
However, the nearly important of the lot is Temporary Files. Select it, and you'll immediately come across a list of areas that hold temporary files, such equally the Downloads binder, Recycle Bin, and Windows Update cache. Next, pick what y'all want to delete and select Remove files.
6. Run or Activate Storage Sense
The Storage pane above also comes with a feature chosen Storage Sense. Actuate it, and you provide Windows x permissions to delete temporary files on your reckoner automatically.
Become to Showtime > Settings > System > Storage > Configure Storage Sense or run it now to admission your Storage Sense settings.
Then, plough on the switch under Storage Sense to activate the feature. Follow that by tweaking the settings to determine how you desire Storage Sense to run on your computer. For example, you can specify when it should run (while depression on deejay space, for example), how often it should delete the contents inside your Recycle Bin and Downloads folder, and so on.
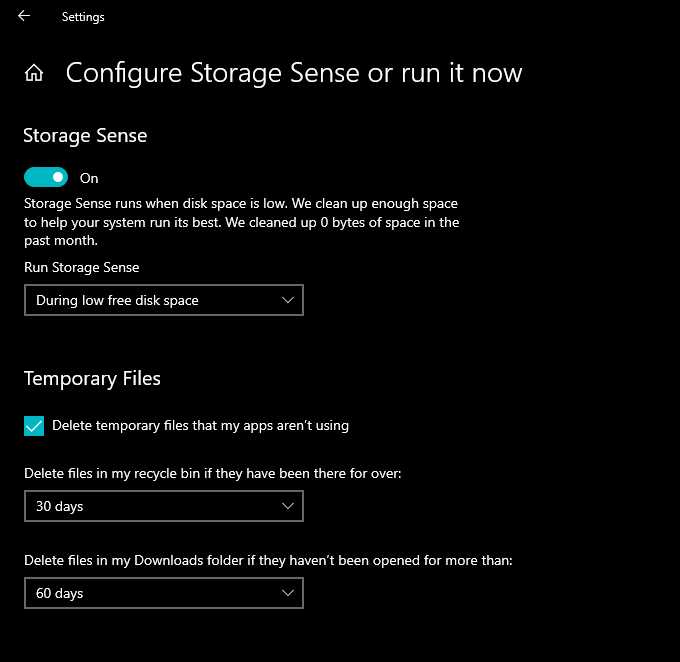
You tin also choose to run Storage Sense manually whenever y'all desire. Only scroll to the bottom of the screen and select Clean at present.
7. Use Disk Cleanup
If you prefer a more compact view than the Storage screen in the Settings app, you tin opt for the legacy Disk Cleanup utility instead. It offers similar functionality and allows you to delete loads of temporary files speedily. You can bring it up by searching for Disk Cleanup on the Get-go menu.
Follow by checking the boxes next to the data types you want to delete—e.m., Windows Update Cleanup, Temporary Internet Files, System error retentiveness dump files, etc. Then, select OK.
You tin can likewise select the Clean up organization files choice to view additional temporary file types.

8. Delete More Temporary Files
Windows x also contains big amounts of other temporary files that you can safely delete. For a consummate step-by-step walkthrough, we recommend checking out this guide almost removing temporary files in Windows 10. Merely hither's the process in cursory.
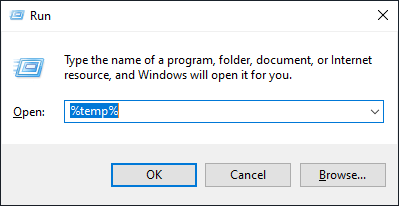
Kickoff past pressing Windows + R to open the Run box. Then, type %temp% and select OK.
Follow by deleting all files and folders inside the directory that shows up. Adjacent, type temp into some other Run box, select OK, and remove all files within that directory as well. Finally, wrap up by restarting your figurer.
9. Articulate Browser Enshroud
When you surf the internet, your browser ends upwards caching data to make subsequent website visits faster. Simply if you're crunched for storage, you tin can chop-chop free up roughly 500 megabytes to ane gigabyte of storage past clearing the browser cache.
Google Chrome
Open up the Chrome menu and select Settings > Privacy and security > Clear browsing data.
On the Articulate browsing data dialog that and so shows upwards, set Time range to All fourth dimension and check the box next to Cached images and files. Finally, select Articulate data.
Mozilla Firefox
Open the Firefox menu and go to Options > Privacy and security > Clear Data (under the Cookies and Site Data section). And so, bank check the box next to Cached Web Content and select Clear.
Microsoft Edge
Open the Edge menu and select Settings. Then, switch to the Privacy, search, and services tab on the sidebar and select Choose what to articulate under Articulate browsing information.
Next, set the Time range to All time, check the box adjacent to Cached images and files, and select Clear data.
ten. Detect Large Files With WinDirStat
WinDirStat is a free and open-source app that allows yous to locate large files and folders on your computer in visual format. After installing and opening the plan, pick the storage drive or segmentation y'all want to browse. You should then see a listing of directories that occupy the most storage, including in percentage form relative to drive size.
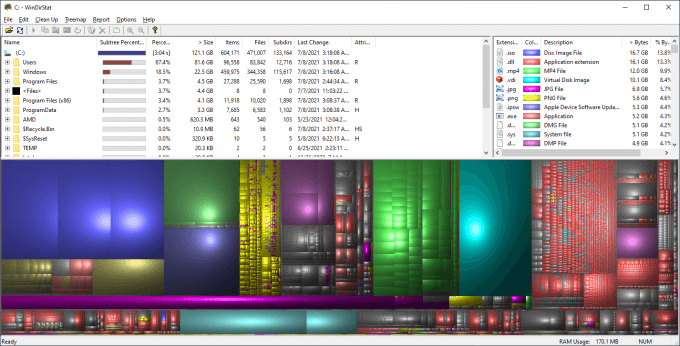
Once WinDirStat finishes scanning the drive, y'all should too run across many colored blocks denoting files (by format) on the called drive. The larger the size, the more space they swallow. You tin correct-click an item and select Explorer Hither to view (and delete) it in File Explorer.
11. Delete Hibernation File
Windows 10's Hide style allows you to restore files and programs fifty-fifty later on y'all've powered down your computer. Just the file that facilitates the functionality by saving the state of the programs and operating system can grunter up a lot of deejay space. So if you don't mind skipping out on using Hibernate, you can choose to disable information technology and reclaim the storage.
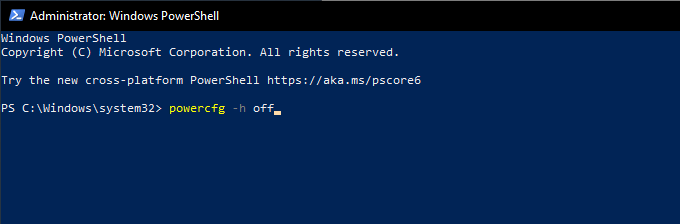
To do that, correct-click the Start button and select Windows PowerShell (Admin). Then, run the control below:
powercfg -h off
Follow that by opening File Explorer. Then, select File > Modify binder and search options.
On the Folder Options dialog box that then shows upward, switch to the View tab and select Prove subconscious files, folder, and drives. Finally, open the Windows 10 installation drive—Local Disk (C:)—and delete the file labeled hiberfil.sys.
For complete step-by-step instructions, check out this guide to disabling Hibernation in Windows ten.
12. Delete Sometime User Accounts
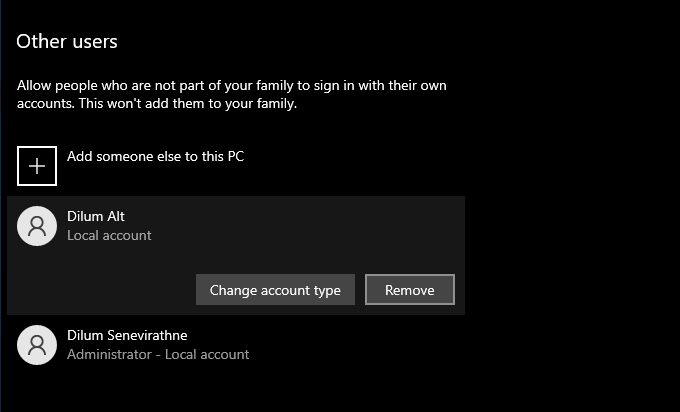
If your computer has multiple Windows 10 user accounts, you might desire to delete any that don't serve a purpose anymore. Just notation that you'll permanently lose all information related to the accounts you remove.
Start past opening the Start menu on your computer. Then, go to Settings > Accounts > Family & other users, select an account from the Other users section, and select Remove.
13. Disable Organisation Restore
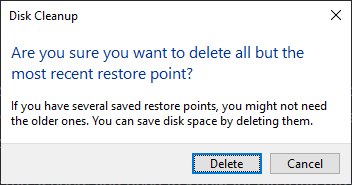
System Restore is a handy backup function that helps you restore your computer to an earlier state should something go wrong. Just it also uses a hefty chunk of storage. So if you're withal running depression on storage, you tin can choose to delete all merely the terminal System Restore signal.
To do that, open up the Disk Cleanup utility, select Clean upwardly organization files, switch to the More Options tab, and select Clean up > Delete.
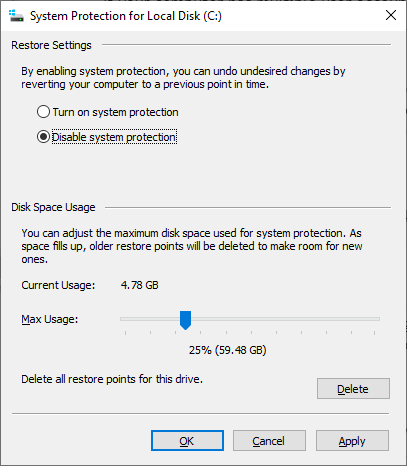
If you don't mind disabling System Restore completely, open the Run box, type sysdm.cpl, and select OK. On the Organisation Backdrop dialog box that shows up, select Configure nether Protection Settings and select the radio push button side by side to Disable organization protection.
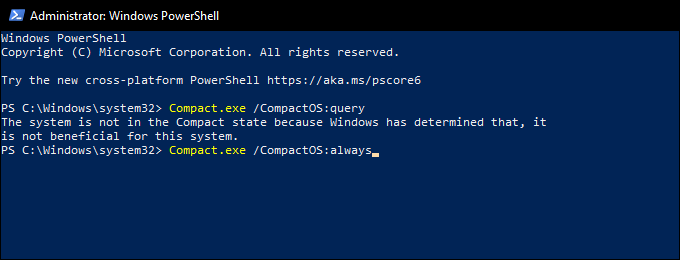
14. Reduce the Size of Windows x
You lot tin can tone downward the size of Windows ten itself to free up deejay space by activating a feature chosen CompactOS. It compresses the operating system slightly and is well worth activating on computers with very little storage space remaining.
Start by right-clicking the Start push button. Then, select Windows PowerShell (Admin) and run the post-obit command:
Compact.exe /CompactOS:query
If yous run into that CompactOS isn't already agile on your organization, run the following control to activate it:
Compact.exe /CompactOS:always
fifteen. Disable Reserved Storage
Windows 10 uses a characteristic called Reserved Storage to ensure it has sufficient space to download and install future operating organisation updates. But that also translates to multiple gigabytes of lost storage. And so, you tin can choose to disable Reserved Storage with a tweak to the organization registry should yous desire.
Start by pressing Windows + R to open the Run box. Then, type regedit and select OK. On the Registry Editor window that shows upwards subsequently, type the following path into the address bar and press Enter:
HKEY_LOCAL_MACHINE\SOFTWARE\Microsoft\Windows\CurrentVersion\ReserveManager
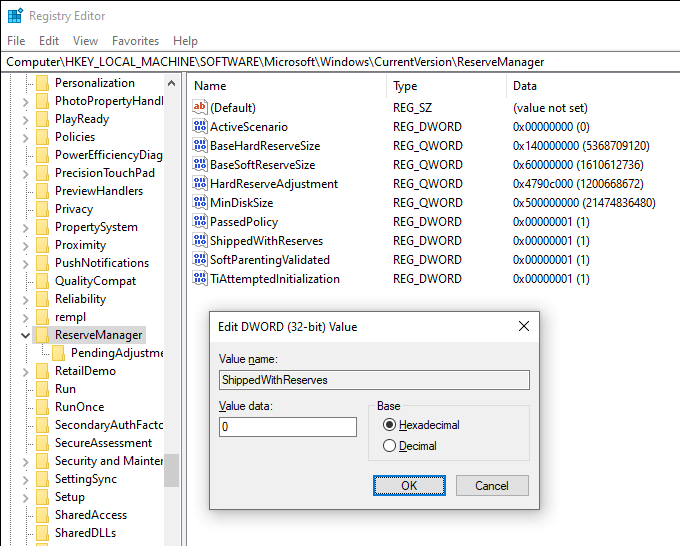
Follow that by double-clicking the ShippedWithReserves cardinal. Then, select Value Data to 0, select OK, and get out the Registry Editor. You must restart your reckoner for the changes to accept effect.
Lots of Space Freed Upwards
The pointers higher up should've definitely helped you free up disk space in Windows ten. Taking the time to ready Storage Sense alone is a neat way to finish yourself from going on transmission cleaning sessions regularly. But whenever yous desire more storage, working your way through the list again tin can help you reclaim large amounts of used-upwards space on your PC.
Do not share my Personal Information.
Source: https://www.online-tech-tips.com/computer-tips/15-ways-to-free-up-disk-space-in-windows-10/
Posted by: bowdenheman1981.blogspot.com
0 Response to "How To Save Disk Space On Windows 10"
Post a Comment